Nanoleaf Canvas, a HomeKit light panel
14/8/19
The starter kit is supplied with nine squares including one control square. If you have high needs, there is nothing to prevent you from adding additional squares, up to 25 in total from a single power supply. Enough to create original, functional or purely decorative lighting, and control everything with a smartphone and HomeKit.
How does Canvas work and what can you get with these illuminated panels? We ordered a starter kit sold for 200 dollars to discover it.
Canvas presentation and installation
The Nanoleaf Canvas starter kit consists of eight light boxes, the essential control box, a power supply unit, nine connectors and 28 double-sided adhesives to attach the boxes to the wall. You don't need any more to create an installation, but if you wish, Nanoleaf also sells expansion packs with four additional light squares, four electrical connectors and twelve adhesives.The basic kit can manage up to 25 light squares, which means four additional expansion packs. If you want a completely bright wall, be aware that the control square can manage up to 500 squares, but you will then have to add power supplies, at the rate of one block for every 25 squares. These additional products are sold on the Nanoleaf shop: count 80 € for an expansion pack and 15 € for a power supply unit.
Nanoleaf provides three adhesives per square of LEDs, enough to hold the system in place. The manufacturer specifies that the panels must be glued on a clean and smooth surface. A wall or ceiling painted or covered with panelling should not be a problem, but placing the squares on a porous and irregular surface, such as bricks, will not be appropriate. For the moment, there is no solution if this is your case, but Nanoleaf will provide an assembly kit later this year to screw the panels into any surface.
Before gluing or screwing the panels into a wall, you can test the Canvas on a table or any other flat surface. This is what I did in this test, because the test copy was going to leave and the rental made me cautious about gluing to the walls. Nanoleaf has provided a very simple and safe procedure to remove the squares if necessary.
Each light square is 15 cm wide. The eight basic squares are strictly identical, the control square is distinguished by the presence of six buttons, to which we will return in the part dedicated to use. Be aware that it contains the Wi-Fi chip, which makes it an essential brick for remote control.

Under each light square, Nanoleaf has placed four three-pin electrical outlets to cover all four sides of the panel. These sockets allow two panels to be connected to each other via connectors supplied by the manufacturer. You can only use a maximum of three of these four sources, but this should cover all needs.
The connectors are made of rigid plastic and perfectly flat. Since each Canvas panel is slightly raised above the wall and even the sockets, the connectors disappear completely during installation, you no longer see them at all when two squares are connected to each other. This is an advantage over Nanoleaf's old triangular design, where the connection between each brick of the light wall remained clearly visible.
In the same way, the power supply connector is flat and designed to disappear as much as possible. The white cord will necessarily remain visible, even if it is always possible to imagine holding it on the side of its installation. Indeed, it is not necessary to power a particular Canvas square, for example you do not need to connect the control square to the power supply unit. The electrical input can come from any square, which will then transmit the energy to all the other squares in the system.
Two more technical details: each square can consume up to 1 W at maximum brightness. The starter kit should remain below 10 W, and the power supply provided by Nanoleaf will deliver a maximum of 24 W. Moreover, the Canvas is designed to be installed indoors, it is neither waterproof nor moisture resistant. It is also better to avoid placing it in a bathroom....
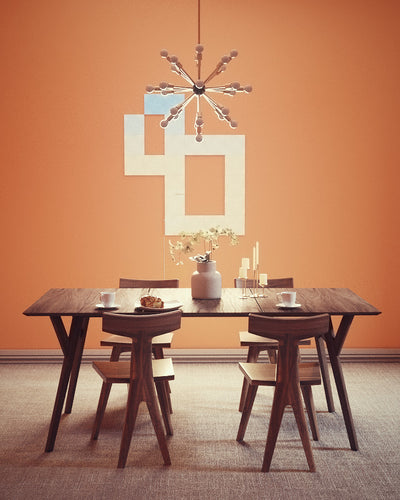
Knowing all this, you can then think about the final installation of your coloured wall. With the basic kit, the simplest solution is to form a square of three light panels on each side, like this:
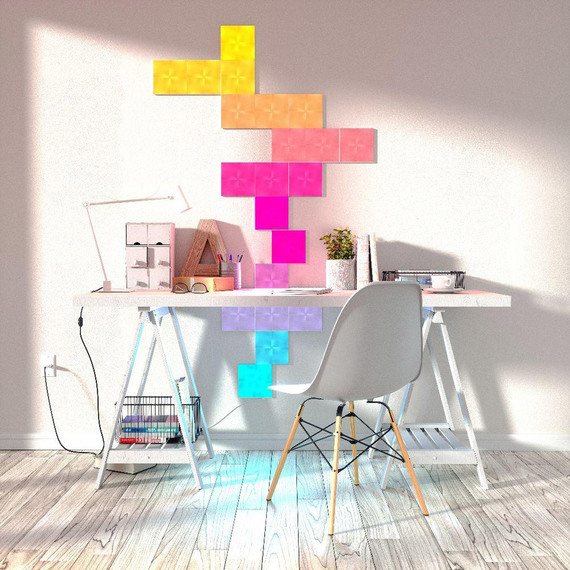
But of course, you don't have to be satisfied with such a simple form, you can let your imagination run wild. You can compose almost any geometric shape as long as each square is connected to at least one other, and you can even leave a gap between two panels if you wish.
To help you configure your light panel correctly, the Nanoleaf app includes a formatting wizard. The latter proposes to generate a shape on the fly, or allows a shape to be composed, by checking that it is feasible, i.e. by ensuring that all the panels are well connected as required.
When you have something satisfying, you can even use augmented reality to "see" what it looks like in real life. Strangely, the iOS app does not support vertical planes, a new feature of ARKit 1.5 (available since iOS 11.3), so you have to use a flat surface, such as a table or the floor.
Once you have the final design in mind, all you have to do is install it with the supplied adhesives. Plug in the installation using the square closest to the outlet, and the Canvas is ready to use!

Canvas in action
The Canvas control panel contains the Wi-Fi chip that allows you to control the installation from a smartphone or HomeKit. But it also contains a minimal control interface, which can provide services on a daily basis. Its six buttons allow you to turn the light on or off, vary the brightness of the squares, change the light scene and activate or deactivate an interactive mode linked to the light.As such, you could use the Canvas exclusively with this control panel, without ever installing the associated app. This may be interesting in some cases, but you would have paid a high price for a connected product to use only some of its functions. The first time you connect the control box, it will switch to connection mode and the ignition button will flash blue.
To connect the Canvas to the local network, you can use Nanoleaf's app with a smartphone under iOS or Android. You will then need to enter the code of your Wi-Fi network, knowing that only 2.4 GHz networks are supported. If you plan to integrate it into the HomeKit ecosystem, there is a simpler way: you can scan the code that is placed on the back of the control box, on the power supply unit or on the manual provided with the product. The iOS device will then provide the Wi-Fi code for you.
Since we are on HomeKit, let's talk about integrating the Canvas into the Home app. The light squares are identified as a connected light, you can give the name you want to an installation and associate it with a room. This way, you can easily turn the light off or on, even with Siri ("Turn off the canvas" or "Turn off the living room").
HomeKit does not know how to manage a LED panel capable of displaying multiple colors, and you will be very limited by staying at the Home app and Siri. You can change only two settings: the brightness of the Canvas, and the color displayed uniformly.
However, the main interest of Nanoleaf's products is to create more complex atmospheres, with different colours on all or part of the squares. Each square can be associated with a different color, but the brightness is global for the entire installation. Nevertheless, this leaves many options at your disposal and the creator of Canvas offers all the necessary tools to make the most of his product.
By default, you will have a large number of scenes to choose from, which highlight the product's possibilities. But you will find hundreds (thousands, probably) more, provided by users of the product. Each scene can be previewed and loaded into the Canvas memory if you want to keep it.
The Canvas can also react according to the environment, and especially to the music. This was already a strong point highlighted by Nanoleaf for its triangular panels, the function is now integrated by default in this product. The idea is to create an atmosphere that automatically adjusts itself according to the music, its rhythm and volume. Depending on your desires, this can create mood lighting or a nightclub effect.
The sound is picked up by the control square and the scenes can use several models predefined by Nanoleaf. It is not possible to associate a square or a color with a frequency, for example, but you can start from any color palette and then choose a mode. Depending on your favourite musical genre and the atmosphere you are looking for, you can choose one mode or another.
According to my tests, you need really loud music for the Canvas to work properly. At an acceptable noise level in apartments, we often have fairly average results, especially for modes that are based on distinct notes. Those who are more interested in creating an atmosphere work better, but I must say that I was not really convinced by the function. Either that, I don't listen to music that is well recognized by Nanoleaf, or I don't listen to music that is loud enough.
It can still be fun in the evening or to change a little bit from the usual colourful scenes. In a living room and near a television set, this may be a good match for a movie, but unlike the Hue, there is no way to match the colors with what is displayed on the screen. If you play with a PC under Windows, on the other hand, there are solutions to associate the lighting with the game, to be discovered on the manufacturer's website.
In addition to sound, the Canvas can also react according to touch. Each light square is equipped with sensors that can detect pressure, and all light scenes react by default to touch. In general, another color replaces the one of the square you touch, but Nanoleaf even offers a few little games, including a Memory that works quite well.
These little games are fun for five minutes, but they are still quite limited and there are only five to download from the app. The touch side of the tiles is also used to control the lighting using any square, not just the control square.
You can set the role of five different gestures in the app: double tap, sweep up or down, slide to the right or left. Each gesture can be used to turn the entire Canvas on and off, increase or decrease the brightness and change scenes. It's a good idea, even if strangely enough, the change in brightness never worked during my tests, while switching from one scene to another and switching off was no problem. The most useful gesture, in my opinion, is to press twice to turn the Canvas on or off.
To finish the owner's tour, the Canvas includes a sensor that allows it to adjust the brightness of its LED squares automatically. If you do not see this option in your model settings, start by updating it, it has been added in a recent version of the firmware.
Before you can activate the automatic mode, you will need to calibrate the Canvas, a procedure that takes a few minutes. The instructions are not very clear and I had a lot of trouble getting a functional calibration. Nanoleaf offers two modes, one where the Canvas is used as lighting and therefore the brightness increases if the ambient lighting is low, and the other where the Canvas is used as atmosphere and does the opposite.
The whole thing may be suffering from bugs, I often found myself with the panel at 100% in the middle of the night, or maybe not far from 0% while the sun was bathing in the room. Maybe you will appreciate the function more, for my part I generally preferred to adjust the brightness by hand, often using the control square for that, or Siri, since HomeKit can adjust this setting without touching the current scene.
About HomeKit, all the color scenes saved in the Nanoleaf app correspond by default to a HomeKit scene, which allows you to go through the Home app or Siri to activate one scene or another. "Enable MacG atmosphere" allows you to configure the scene of the same name on the Canvas.
Even if it is not ideal, these scenes allow you to integrate the Canvas into your HomeKit routines. You can activate the panel with a perfect mode for the morning, or cut it with another mode for the evening. On my side, I use xiaomi aqara smart wireless switch and I configured them in the Eve app so that a click is associated with two scenes: the one that activates the usual lights, and those of the Canvas.
To make your life easier, the Canvas retains the last scene when it is switched on. If you use only one scene, you can just ask Siri to "turn the light on/off in the office" and you will always find the same scene and settings.
Conclusion
With a starter kit sold for 200 dollars, the Canvas is not a cheap solution, especially if you want to create installations as impressive as those presented by Nanoleaf on its website. The pack of 25 light squares is sold just under the 500 dollars bar on the manufacturer's shop, it makes a big bill for a lighting, even if connected.For this price, however, you will have a very good solution, both for ambient lighting and for lighting a room. The Canvas is bright enough to serve as the only source of light and even the starter kit used alone can be enough for a room or office. In itself, Hue lighting kits remain cheaper and with enough bulbs or fixtures, you can reproduce the mood lighting of the Canvas.

Nevertheless, being able to position the light squares on a wall or ceiling is an undeniably very elegant solution and the result can be very clean. And with the corresponding budget, you can illuminate entire walls or ceilings. Without going that far, you can install several Canvas in your home and synchronize the panels so that they all display the same thing at one time.
We can also welcome all the solutions proposed by Nanoleaf to control the product. You can use the main voice assistants on the market, Siri via HomeKit, but also directly Google Assistant or Alexa from Amazon. You can use a smartphone or tablet using the Home app on iOS, or the Nanoleaf app. Even if it is not an official solution, there is also a control app for Windows, macOS and even Linux.
But if you have nothing on hand, the control panel allows you to quickly turn the light on or off, or manage the brightness. It's not as obvious as a wall switch, but it allows anyone to manage the Canvas, without having to go through an app or a voice assistant. It's nice to have so many options and even though I've mainly used HomeKit, I can imagine that a guest would appreciate being able to turn everything off by clicking on a physical button. To be complete, let's also mention the existence of a Nanoleaf remote control, a dodecahedron where each of the twelve faces can be associated with a different HomeKit scene.
In material terms, I do not have any major criticisms to make. I thought the lighting would be more uniform, but the subdivision of each light square into four squares is not aesthetically unpleasant. The Canvas would be even better in itself if these four squares inside each tile could display different colors, but in the meantime, this rendering with a cross in the middle of each square is not unpleasant. In retrospect, I would even say that this gives the product an additional personality.
The Canvas is also a very well designed product, easy to configure and install. I had some disconnection problems at first, but after updating the device with the latest firmware, all my concerns were eliminated. Some functions, such as synchronization with music or tactile gestures, remain largely gadgets I find, but they do not take anything away from the heart of the product.
Its integration into the HomeKit ecosystem is still perfectible, but it is more Apple's fault than Nanoleaf's. And even if it is not the best solution, the use of HomeKit scenes allows you to control the Canvas using the home automation app of iOS and macOS or Siri.
In short, if you are looking for original lighting and the asking price does not frighten you, the Canvas is a very interesting solution. It requires more effort than a bulb or Hue lamp, but offers incomparable flexibility and can be adapted to more cases.
Partagez sur les réseaux sociaux
Catégorie